
How to Properly Grind Coffee Beans: A Practical Guide
What if your coffee tastes bitter, weak, or uneven not because of your brewing method, but because the grind doesn’t suit it? Learning how to properly grind coffee beans starts with matching particle size to the time water spends with the grounds. Get that match right, and you’re on firmer ground for a balanced cup.
It’s frustrating when careful brewing still delivers a cup that tastes off. Grinder settings can feel like guesswork, especially when one method calls for fine grounds and another needs coarse ones. You don’t need complicated equipment or perfect instincts to make a better cup. A few clear principles and small, taste-led adjustments can help you brew more consistently.
This guide will help you choose a grind size for your brewing method, use your grinder with confidence, and adjust when coffee tastes bitter or sour. You’ll also learn why grinding just before brewing can preserve aroma, while recognizing that whole bean and ground coffee can both have a place in your routine.
Key Takeaways
- Start with a grind texture suited to your brewing method, then fine-tune the setting to match your grinder and taste.
- Learn how to properly grind coffee beans with a repeatable process: set your grind, brew, taste, and adjust one step at a time.
- A burr grinder produces more consistent particles than a blade grinder, making it easier to brew and adjust with confidence.
- Use taste as your guide: bitterness can signal grounds that are too fine, while sourness may point to a grind that’s too coarse.
- Choose a routine that fits your time and equipment. Grinding whole beans fresh is an option, not a requirement for a satisfying cup.
How to Properly Grind Coffee Beans for a Better Cup
If you’re new to grinding coffee, start with this: you don’t need to master a dozen settings at once. Your brewing method gives you a useful starting point. From there, small adjustments can help you find a cup that tastes balanced and is easier to repeat.
Grind size is the size of the coffee particles after grinding, not a measure of how strong the coffee is. Strength depends on factors such as how much coffee and water you use, while particle size affects how quickly water draws flavor from the grounds. The core idea behind how to properly grind coffee beans is simple: match particle size to the brewing method so water extracts flavor at a suitable pace.
That match matters because brewing depends on contact between water and ground beans. Finer particles expose more surface area, giving water more access to the coffee; larger particles expose less. A helpful definition to keep in mind is: Grind size is the particle size chosen to suit a brewing method’s contact time and guide flavor extraction. For a general overview of the process of coffee grinding, you can explore how grinding prepares beans for brewing.
Why grind size changes the flavor in your cup
Think of grind size as one part of a brewing system, not a flavor dial that works alone. If water extracts flavor too quickly, the cup may taste thin or sharp; if extraction takes too long, it can taste harsh or overly intense. Coffee-to-water ratio, water temperature, brew time, and the beans themselves also affect flavor. Adjust one variable at a time so you can tell what changed the result.
Freshly ground coffee versus pre-ground coffee
Grinding shortly before brewing can help preserve the beans’ aroma. Once coffee is ground, more of its surface is exposed to air, and its fragrance can fade over time. If you enjoy the ritual and have a grinder, grind only what you need for the brew. Whole beans suit that routine well.
Pre-ground coffee is also a convenient, valid choice, especially when ease and speed matter. Good coffee doesn’t require a grinder on the counter. Choose the format that fits your day and prepare it thoughtfully. Split Rock Coffee offers whole bean and ground coffee choices, so you can find a routine that works for you.
Match Coffee Grind Size to Your Brewing Method
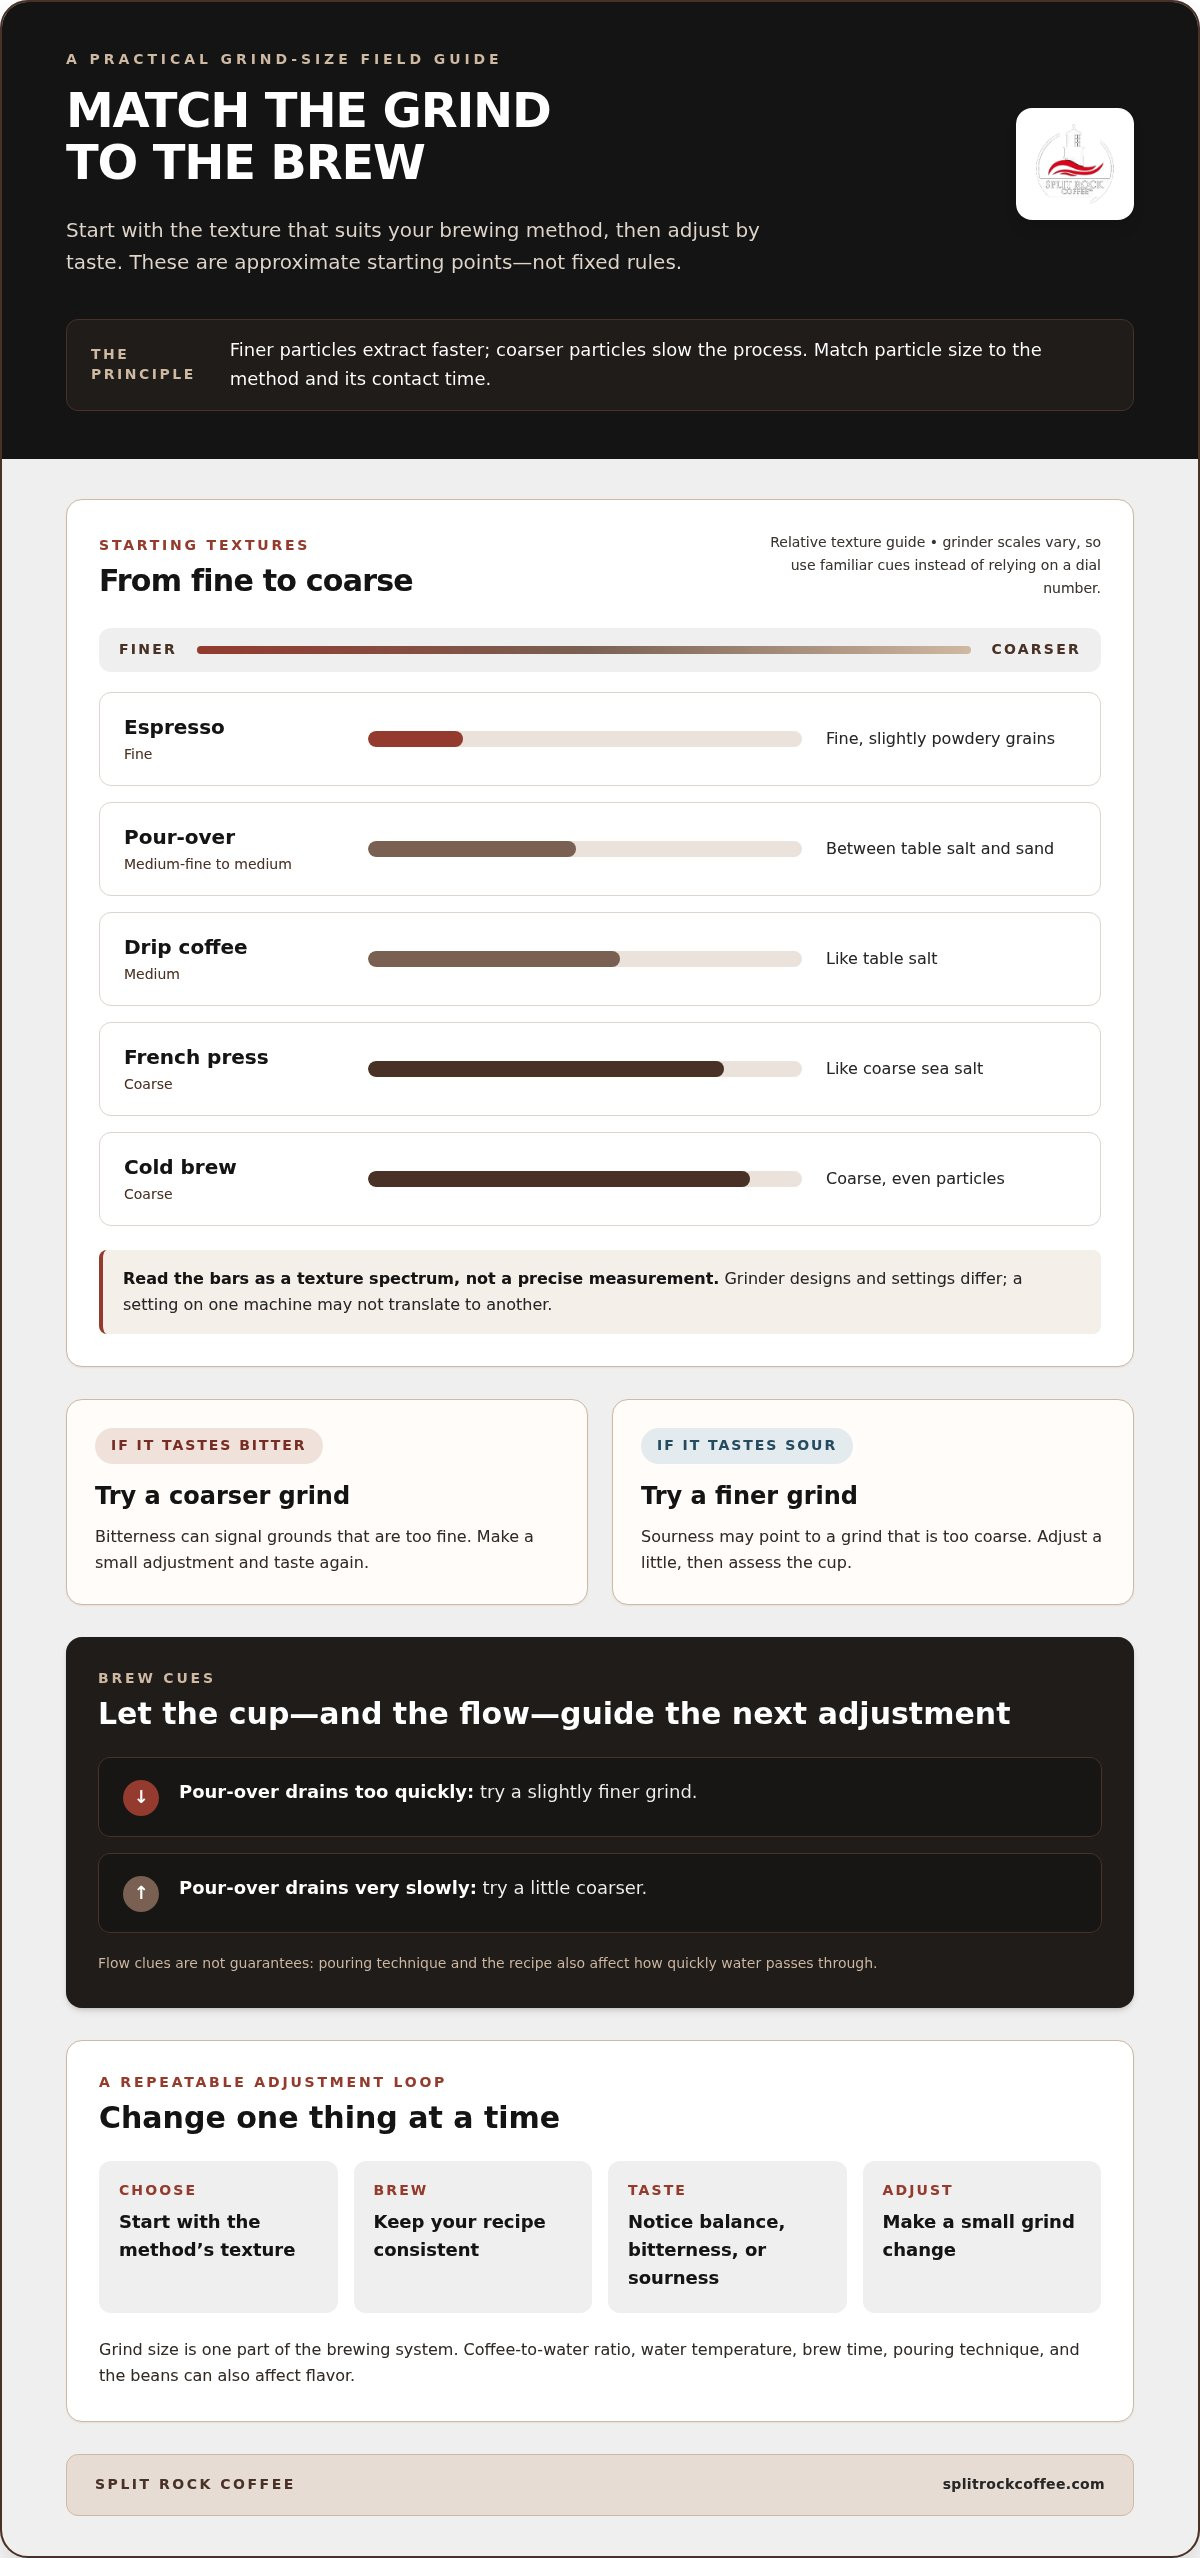
There isn’t one correct grind setting for every cup. Espresso, pour-over, drip coffee, French press, and cold brew bring water into contact with coffee in different ways, so each needs a useful starting texture. Treat the suggestions below as a field guide, not a fixed rulebook. Grinder scales and burr designs vary, and personal taste matters.
Grind size is method-dependent: choose a particle texture that suits your brewing equipment and contact time, then adjust to taste. In general, finer grounds extract faster because water reaches more coffee surface; coarser grounds slow the process. The aim is a balanced result, not a perfect match to a number printed on a dial.
Starting grind sizes for common brewing methods
Use familiar textures to find a first setting. These comparisons are approximate, but they’re more useful than relying on a grinder number that may not translate across machines.
| Brewing method | Starting texture | Everyday cue |
|---|---|---|
| Espresso | Fine | Fine, slightly powdery grains |
| Pour-over | Medium-fine to medium | Between table salt and sand |
| Drip coffee | Medium | Like table salt |
| French press | Coarse | Like coarse sea salt |
| Cold brew | Coarse | Coarse, even particles |
Start near the suggested texture, brew as usual, and make a small change if the cup tastes unbalanced. If a pour-over drains too quickly, try a slightly finer grind. If it drains very slowly, try a little coarser. These are clues, not guarantees, because pouring technique and recipe also affect flow. Grinder calibration varies, so don’t assume “setting 10” means the same thing on another machine.
Why one grind setting does not fit every brew
Contact time and equipment shape the target. Espresso pushes water through a compact bed quickly, while immersion brewing keeps grounds steeping in water for longer. A grind that works for espresso may slow a pour-over too much; one suited to French press may let water pass through an espresso bed too quickly. For more detail on that brewing method, follow this pour-over coffee brewing guide.
Use the table to choose where to begin, then keep your grinder setting consistent while assessing the cup. That gives each adjustment a clear purpose and makes it easier to learn how to properly grind coffee beans for your setup. If you’re ready to practice with beans you can grind fresh, explore Split Rock Coffee’s whole bean selections.
Burr or Blade Grinder: Choose the Right Tool for Consistency
The grinder affects how consistently coffee particles meet water. A mix of fine powder and larger pieces can extract unevenly, making a brew harder to repeat. A burr grinder is designed to give you more control over particle size, while a blade grinder offers a simple way to chop beans. Neither choice needs to be a barrier to making coffee at home.
How burr grinders produce a more even grind
A burr grinder draws beans between two abrasive surfaces, called burrs, which crush them into smaller particles. Adjusting the grinder changes the space between those surfaces and, in turn, the grind size. Burr grinders come in different designs and price ranges, but their practical advantage is the ability to produce a more consistent grind than a blade grinder.
Consistency makes it easier to dial in a brew. When particles are closer in size, water is less likely to extract very small pieces quickly while larger pieces lag behind. You can make a small setting change, brew again, and more clearly judge its effect. That repeatable process helps you apply the principles of how to properly grind coffee beans to your equipment and recipe.
When a blade grinder can still be useful
A blade grinder uses a spinning blade to chop beans rather than crushing them between set surfaces. The result may include fine particles and larger chunks, making extraction harder to predict and the grind harder to recreate from one brew to the next. Still, if a blade grinder is what you have, it can get you started. Home brewing doesn’t depend on owning premium equipment.
Use a measured approach to make the grind more uniform:
- Grind in short pulses instead of running the blade continuously.
- Pause between pulses and gently shake the grinder so larger pieces move closer to the blade.
- Check the grounds, then pulse again briefly if they still look uneven.
These steps can help, though a blade grinder won’t offer the same direct control over particle size as a burr grinder. Take care when handling the grinder, and follow its instructions for use.
Choose based on what matters in your routine. A burr grinder is a sound option if you want finer control and repeatable adjustments, especially as you explore different brewing methods. A blade grinder can be a practical starting point if simplicity is the priority. If grinding at home doesn’t suit your day, pre-ground coffee remains a valid choice. The best tool is one you’ll use consistently and carefully.
A Repeatable Method for Grinding and Adjusting Coffee
A steady routine turns grinder adjustments from guesswork into useful feedback. Keep the recipe consistent, change one variable at a time, and let the brewed cup guide your next move. This is how to properly grind coffee beans for your own setup: make a measured change, taste the result, and repeat only when needed.
Set up the grinder and measure the beans
Start with your grinder’s instructions, especially for adjusting settings, operating the machine, and cleaning it. Measure the beans you plan to brew using the same approach each time. Consistent amounts make comparisons meaningful: if the dose changes along with the grind, it’s harder to tell which adjustment affected the cup. When practical, grind only what you need for the brew at hand.
Ground coffee can remain inside a grinder after use. Follow the manufacturer’s directions for removing retained grounds, such as using a suitable brush if the instructions allow it. Don’t reach into moving parts or use water unless the manual says it’s appropriate. A clean, safely handled grinder helps keep old grounds from mixing into your next dose.
Use taste to fine-tune the next grind
Once you’ve selected a starting texture for your brewing method, use the same coffee dose, water amount, and brewing routine for your first test. Then make a small grind adjustment based on what you taste. Bitterness or a harsh finish can be a cue to try a slightly coarser grind. Sourness or a thin, underdeveloped taste can be a cue to try a slightly finer one. These are useful signals, not a diagnosis on their own; water, brew time, and other factors can also affect flavor.
- Choose your brewing method. Decide how you’ll prepare the coffee before setting the grinder.
- Select a starting grind. Use a texture suited to the method and the grinder’s own scale.
- Measure and grind. Keep the coffee dose consistent, and grind the amount needed for this brew when practical.
- Brew as usual. Hold your recipe steady so the result can tell you something useful.
- Taste and adjust. Change the grind slightly, brew again, and compare before altering another variable.
Troubleshooting rule: If the cup tastes bitter or harsh, test a slightly coarser grind; if it tastes sour or thin, test a slightly finer grind. Change nothing else until you’ve tasted again.
Resist the urge to change grind size, dose, water, and brew time all at once. Make one adjustment, take a moment to taste, and keep a brief note of the setting and result if that helps you repeat a good cup. If you’re ready to put the routine to work with fresh beans, choose whole bean coffee for your next brew.
Make Better Coffee with the Grind That Fits Your Routine
A reliable cup doesn’t require a complicated setup. Choose the brewing method first, select a suitable starting grind, prepare each brew consistently, then let taste guide small adjustments. That sequence gives you a practical way to put the advice on how to properly grind coffee beans into action, whether you brew before work or take more time with a weekend pour-over.
Build a simple coffee-grinding routine
Progress comes from keeping your tests steady. Use the same method, coffee amount, water, and brewing steps while you assess a grind setting. If the flavor needs work, adjust the grind slightly and try again before changing another part of the recipe. A few notes can help you remember what worked.
- Record the brewing method and grinder setting.
- Note the coffee dose and any recipe details you’re holding steady.
- Write down a short taste impression, such as balanced, bitter, sour, or thin.
- Change one variable for the next brew, then compare.
Good preparation also includes looking after the beans. Keep them sealed in an airtight container and store it away from air, heat, light, and moisture. A cool, dry cupboard is a practical choice. For whole beans, grind only what you need for the current brew when that fits your routine. Properly storing the remaining beans helps preserve their aroma.
Choose coffee in the format that suits your mornings
Whole bean coffee suits people who enjoy grinding shortly before brewing and want to adjust the texture for different methods. Ground coffee makes preparation simpler: measure, brew, and get on with the day. Neither format is right for everyone. Let your time, equipment, and preferred brewing style shape your routine, rather than a rule that says every cup must begin with a grinder.
Split Rock Coffee offers both whole bean and ground coffee, including Low Acid Coffee Blends and The Gold Standard Coffee Beans. Choose whole beans if you’re ready to grind fresh, or ground coffee if convenience works better for you. A monthly coffee subscription is also available for regular delivery of your preferred coffee. Either way, a thoughtful method and attention to taste can make your daily cup more consistent. Explore Split Rock Coffee to find coffee that fits your routine.
Make Your Next Cup a Fresh Start
Your next brew is a chance to learn what you like. Pick one small experiment, such as a slight grind adjustment, and give it a few cups before deciding whether it works. Over time, deliberate choices can turn brewing into a dependable ritual shaped around your mornings and your own taste.
You don’t need to make the process complicated to enjoy coffee well. Whether you’re practicing how to properly grind coffee beans or keeping preparation simple with ground coffee, choose the routine you’ll return to. Split Rock Coffee offers whole bean and ground options, along with Low Acid Coffee Blends and The Gold Standard Coffee Beans.
Explore Split Rock Coffee’s whole bean and ground coffee and choose the format that fits your day. Start with a method you enjoy, trust your palate, and refine your grind one adjustment at a time.
Frequently Asked Questions
How fine should I grind coffee beans for a regular coffee maker?
For a standard drip coffee maker, start with a medium grind, roughly like table salt. Treat that as a baseline rather than a guaranteed setting, since basket shape, paper filters, and grinder calibration can affect how water flows through the grounds. If brewing takes unusually long or the coffee tastes unbalanced, make a small grind adjustment and keep the rest of your recipe steady for comparison.
Can I grind coffee beans without a coffee grinder?
Yes. A mortar and pestle can crush beans, while a sturdy sealed bag and rolling pin can break them down with a little effort. Work in small batches and check the texture as you go; these methods usually produce less uniform grounds than a dedicated grinder. Choose a texture that suits your brewer, and avoid using tools that could crack, spill, or create a safety hazard.
Is a burr grinder better than a blade grinder for coffee?
A burr grinder is generally better for producing grounds of a more consistent size, which helps make brewing results easier to repeat. A blade grinder chops beans, so its results can vary from fine particles to larger pieces. If you already own a blade grinder, you can still make coffee with it. Use short pulses and check the grounds between them rather than running it continuously.
How much coffee should I grind for one cup?
It depends on what you call a cup and how strong you like your coffee. A mug often holds more than a coffee maker’s serving marked as one cup, so measure the water you’ll actually brew rather than relying on the word “cup.” If you have a kitchen scale, weigh the coffee and water using your brewer’s recipe. Otherwise, begin with its scoop guidance and adjust to taste.
Can I grind coffee beans the night before?
Yes, you can grind beans the night before, though grinding just before brewing generally preserves more aroma. If preparing ahead makes your morning easier, grind only the portion you’ll use and seal it in an airtight container away from heat, light, and moisture. Keep the container dry and closed until brewing. For the freshest fragrance, make grinding part of your morning routine when practical.
What happens if my coffee grounds are too fine or too coarse?
Grounds that are too fine may slow water flow, create a muddy cup, or make a filter basket drain poorly. Grounds that are too coarse can let water pass quickly, leaving the coffee tasting weak. These are clues, not certain diagnoses, because brew ratio and time matter too. Change the grind slightly, then taste another brew before changing your recipe.
Do different coffee beans need different grind settings?
Sometimes, but start by matching the grind to your brewing method rather than assuming every bean needs its own setting. If a new coffee tastes different with your usual recipe, make a small adjustment and compare. Roast level, freshness, and the way a particular coffee behaves in your brewer can all influence what tastes balanced. Keep notes so you can return to settings that work.


